- Leitfäden
Maintenance of your Rioned Camera System

Like any piece of equipment, the maintenance of your Rioned camera system will help to prolong the life of it. We’d like to help, so we have compiled this checklist of key maintenance points to be aware of when using and transporting your Rioned camera system to help keep it working by your side for as long as possible.
Before we begin…
Just to be clear, we are not here to teach you drainage professionals to suck eggs, you clearly know your stuff because your drain camera of choice came from us! But seriously, these are maintenance tips that we have picked up from a number of professionals over the years that have helped them to keep their camera system on the road for longer.
Inserting the camera into the drain
Now, no matter how good your drain camera maintenance is, there is one part of the system that, with repeated use, will wear down and need repairing action. We are speaking of course about the push-rod itself, the first few feet of it to be specific, which rubs on the entry to the drain pipeline and can wear through the tough exterior and eventually expose the cabling inside. When this happens, it is time to get your push-rod re-terminated.

This push-rod has worn through to expose the wires inside
THE SOLUTION:
Making a launcher from a spare piece of pipe can help to reduce the tight entry angle into the surveying pipe, and if clean can guarantee minimal friction and subsequent wear on the push-rod. If the angle isn’t as tight, you could also lay a section of liner down at the entry to the surveying pipeline, around 1ft either side of the entry.
Performing the survey
How do we say this delicately….this is a camera, not a battering ram! All too many times we receive cameras back for repair with cracked lenses and subsequent water ingress, and also kinked push-rod because of the excess pressure. Still the operators insist that they didn’t use the camera to unblock the pipe. Until we see the video recorded…
THE SOLUTION:
Patience. Unfortunately sometimes it is what it is, and if the blockage cannot be gently pushed aside you should pause your survey and note the distance. Once you have cleared the blockage (with the necessary tools) you can return to your survey from the point you paused it at, or, if time is on your side start from the beginning. The time (and money) you could save by not using your camera as a battering ram!

Asserting too much pressure to try to clear a blockage with the camera might kink your push-rod
Managing the speed of the push-rod
Our drain camera systems range from 40m to 120m push-rod length, and if you’re not careful with the handbrake, the camera and rod can get away from you very quickly, and risk damaging the camera head should it come to a sudden stop, as well as risking kinking the rod and needing a re-termination.
THE SOLUTION:
Managing the handbrake. It’s not a case of “on” or “off”, the brake is there to help you manage the release of the push-rod, and the friction caused by the brake stabilizes it, allowing the camera operator to put the “push” in “push-rod”! Release the brake accordingly to manage the speed.

The handbrake can be used to manage the speed at which the rod is released
Cleaning your camera system
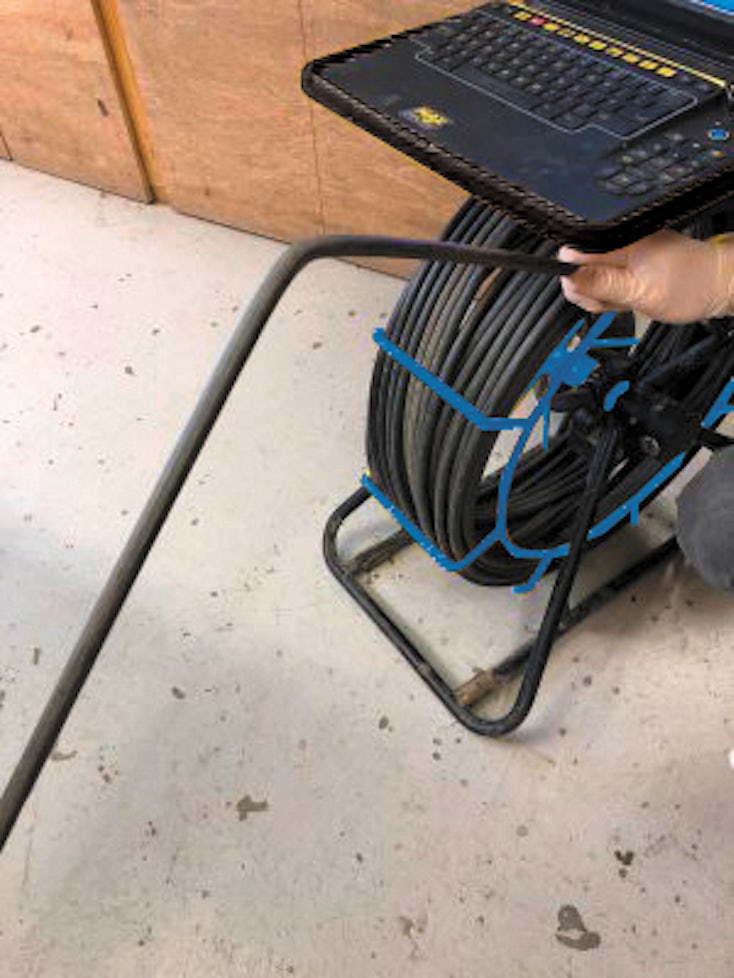
When you come to clean your MaxCam or FlexCam camera system, first ensure that the control box is closed, with the clips on the side secured. If you have access to a hose, you can lightly hose down the rod and coiler to remove the looser debris, or if not, a well-directed brush and bucket of water will do the trick. A pressure washer is not only overkill but certainly not recommended.
After every job we recommend that you pay particular attention to the rollers that guide the push-rod back into the cage. Debris can collect here and when dried can work towards wearing the push-rod down.
Another method to help maintain the life of your push-rod is to clean the rod as you are reeling it back in. With a dry cloth in one hand, lightly grip the push-rod as the other hand feeds it through to catch and remove any loose debris.

Push the rubber flap down to create a water-tight seal before cleaning
The control box itself is also rain and shower-proof when all data and connector ports are fully closed, and the fully-enclosed keyboard means that you can give this a thorough clean and wipe-down. We recommend cleaning the boxes with anti-bacterial wipes, but either way be sure when cleaning the box that you have firmly pressed down the protective rubber flap to seal away the data ports to the right of the screen. It is also important to make sure that either the cable connectors or rubber bungs in the back of the control box are firmly in place in order to keep out water ingress. When you have finished cleaning, or using in the rain, be sure to dry the box off before closing it, as any trapped moisture will find its way inside and keep your system off the road.
Storing the camera head
This one is a simple one, and from our experience a lot of people will read this and say “Oh, I do that”, but trust us, it’s better for the long-term maintenance of your camera system if you don’t. When transporting your MaxCam it can be tempting to “stop the camera bouncing around” by tucking the camera head inside the rod cage, but this is a bad idea. Doing this will only serve to disfigure the camera spring and as a result impact on the quality of your actual survey.

Storing the camera head inside the cage will disfigure the spring
THE SOLUTION:
Wind the rod back in as much as you comfortably can, until the camera head cannot bounce around uncontrollably in the back of your van, and then tighten the hand-brake inside the cage to secure the push-rod. No bouncing, no disfigurement! If you want, you could even disconnect the camera head between use if you have somewhere secure to store it, but just be sure to connect the metal dust-caps supplied to both the camera connector and the push-rod connector. You would need to be careful to ensure that you correctly line up the pins in the connector when re-attaching the camera.

The spanners supplied with your Rioned system can loosen or tighten your camera head
Stowing the camera system in the van
Now, every van set-up is different, so the recommendations for this section are simple and generic in places.
THE RECOMMENDATIONS:
1. If space is limited, be sure to position your camera system where it cannot move around whilst the van is in transit. It can weigh anywhere up from 29kg so a loose MaxCam could cause all kinds of damage to itself and the surrounding tools.
1.1 If space is a plenty, securing your MaxCam with ratchet straps to the
static hooks in the van is the best option, though be sure to wrap them
around the body of the camera system to spread the tension, and not
around isolated bars that could bend under extreme pressure.
2. Unplug and remove the control box from the camera frame. We generally recommend to keep it upfront in the cab, but ultimately you want to avoid the scenario where you hit a speed-bump a little too hard and the box comes flying off.
In summary
There is obviously a clear relationship between the maintenance of your camera system and the lifespan of it; this rule applies to most walks of life. Hopefully these maintenance tips will help you to keep your camera systems on the road and out of the service workshop a little longer, but be assured that when needs must, our expert Service Team will be here and happy to get you and your MaxCam or FlexCam back on the road!
- Leitfäden


